Налаштуйте Swagger UI
🌐 Переклад ШІ та людьми
Цей переклад виконано ШІ під керівництвом людей. 🤝
Можливі помилки через неправильне розуміння початкового змісту або неприродні формулювання тощо. 🤖
Ви можете покращити цей переклад, допомігши нам краще спрямовувати AI LLM.
Ви можете налаштувати додаткові параметри Swagger UI.
Щоб їх налаштувати, передайте аргумент swagger_ui_parameters під час створення об’єкта додатка FastAPI() або до функції get_swagger_ui_html().
swagger_ui_parameters отримує словник із налаштуваннями, що передаються безпосередньо до Swagger UI.
FastAPI перетворює ці налаштування на JSON, щоб зробити їх сумісними з JavaScript, оскільки саме це потрібно Swagger UI.
Вимкніть підсвітку синтаксису
Наприклад, ви можете вимкнути підсвітку синтаксису в Swagger UI.
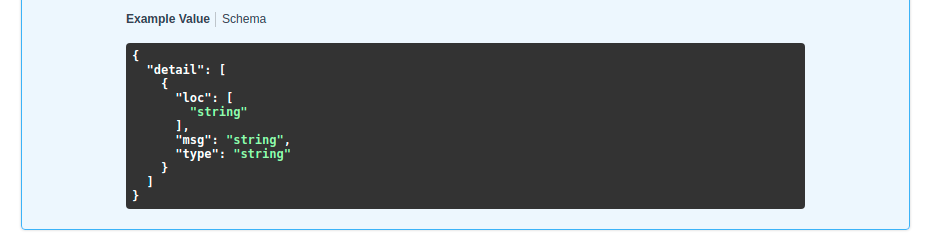
Без змін у налаштуваннях підсвітка синтаксису увімкнена за замовчуванням:
Але ви можете вимкнути її, встановивши syntaxHighlight у False:
from fastapi import FastAPI

app = FastAPI(swagger_ui_parameters={"syntaxHighlight": False})


@app.get("/users/{username}")
async def read_user(username: str):
    return {"message": f"Hello {username}"}
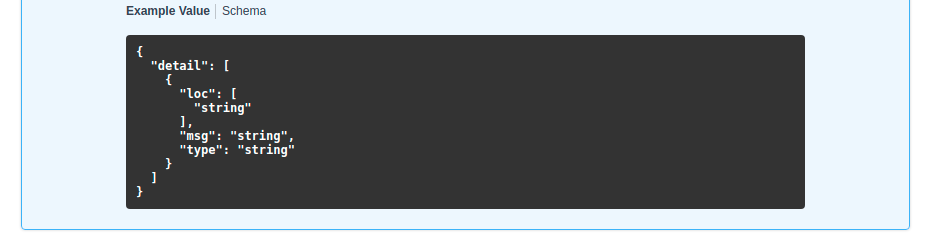
...після цього Swagger UI більше не показуватиме підсвітку синтаксису:
Змініть тему
Так само ви можете задати тему підсвітки синтаксису ключем "syntaxHighlight.theme" (зверніть увагу, що посередині є крапка):
from fastapi import FastAPI

app = FastAPI(swagger_ui_parameters={"syntaxHighlight": {"theme": "obsidian"}})


@app.get("/users/{username}")
async def read_user(username: str):
    return {"message": f"Hello {username}"}
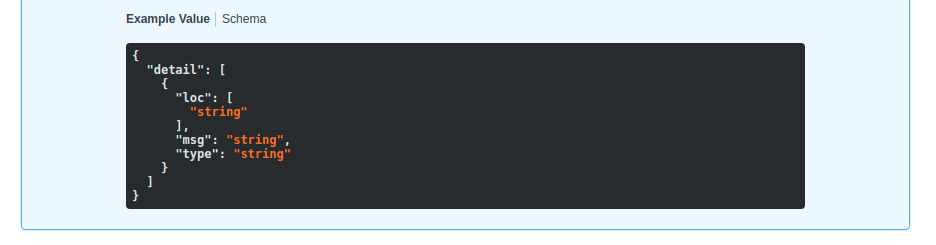
Це налаштування змінить колірну тему підсвітки синтаксису:
Змініть параметри Swagger UI за замовчуванням
FastAPI містить деякі параметри конфігурації за замовчуванням, що підходять для більшості випадків.
Вони включають такі типові налаштування:
# Code above omitted 👆

def _html_safe_json(value: Any) -> str:
    """Serialize a value to JSON with HTML special characters escaped.

    This prevents injection when the JSON is embedded inside a <script> tag.
    """
    return (
        json.dumps(value)
        .replace("<", "\\u003c")
        .replace(">", "\\u003e")
        .replace("&", "\\u0026")
    )


swagger_ui_default_parameters: Annotated[
    dict[str, Any],
    Doc(

# Code below omitted 👇
👀 Full file preview
import json
from typing import Annotated, Any

from annotated_doc import Doc
from fastapi.encoders import jsonable_encoder
from starlette.responses import HTMLResponse


def _html_safe_json(value: Any) -> str:
    """Serialize a value to JSON with HTML special characters escaped.

    This prevents injection when the JSON is embedded inside a <script> tag.
    """
    return (
        json.dumps(value)
        .replace("<", "\\u003c")
        .replace(">", "\\u003e")
        .replace("&", "\\u0026")
    )


swagger_ui_default_parameters: Annotated[
    dict[str, Any],
    Doc(
        """
        Default configurations for Swagger UI.

        You can use it as a template to add any other configurations needed.
        """
    ),
] = {
    "dom_id": "#swagger-ui",
    "layout": "BaseLayout",
    "deepLinking": True,
    "showExtensions": True,
    "showCommonExtensions": True,
}


def get_swagger_ui_html(
    *,
    openapi_url: Annotated[
        str,
        Doc(
            """
            The OpenAPI URL that Swagger UI should load and use.

            This is normally done automatically by FastAPI using the default URL
            `/openapi.json`.

            Read more about it in the
            [FastAPI docs for Conditional OpenAPI](https://fastapi.tiangolo.com/how-to/conditional-openapi/#conditional-openapi-from-settings-and-env-vars)
            """
        ),
    ],
    title: Annotated[
        str,
        Doc(
            """
            The HTML `<title>` content, normally shown in the browser tab.

            Read more about it in the
            [FastAPI docs for Custom Docs UI Static Assets](https://fastapi.tiangolo.com/how-to/custom-docs-ui-assets/)
            """
        ),
    ],
    swagger_js_url: Annotated[
        str,
        Doc(
            """
            The URL to use to load the Swagger UI JavaScript.

            It is normally set to a CDN URL.

            Read more about it in the
            [FastAPI docs for Custom Docs UI Static Assets](https://fastapi.tiangolo.com/how-to/custom-docs-ui-assets/)
            """
        ),
    ] = "https://cdn.jsdelivr.net/npm/swagger-ui-dist@5/swagger-ui-bundle.js",
    swagger_css_url: Annotated[
        str,
        Doc(
            """
            The URL to use to load the Swagger UI CSS.

            It is normally set to a CDN URL.

            Read more about it in the
            [FastAPI docs for Custom Docs UI Static Assets](https://fastapi.tiangolo.com/how-to/custom-docs-ui-assets/)
            """
        ),
    ] = "https://cdn.jsdelivr.net/npm/swagger-ui-dist@5/swagger-ui.css",
    swagger_favicon_url: Annotated[
        str,
        Doc(
            """
            The URL of the favicon to use. It is normally shown in the browser tab.
            """
        ),
    ] = "https://fastapi.tiangolo.com/img/favicon.png",
    oauth2_redirect_url: Annotated[
        str | None,
        Doc(
            """
            The OAuth2 redirect URL, it is normally automatically handled by FastAPI.

            Read more about it in the
            [FastAPI docs for Custom Docs UI Static Assets](https://fastapi.tiangolo.com/how-to/custom-docs-ui-assets/)
            """
        ),
    ] = None,
    init_oauth: Annotated[
        dict[str, Any] | None,
        Doc(
            """
            A dictionary with Swagger UI OAuth2 initialization configurations.

            Read more about the available configuration options in the
            [Swagger UI docs](https://swagger.io/docs/open-source-tools/swagger-ui/usage/oauth2/).
            """
        ),
    ] = None,
    swagger_ui_parameters: Annotated[
        dict[str, Any] | None,
        Doc(
            """
            Configuration parameters for Swagger UI.

            It defaults to [swagger_ui_default_parameters][fastapi.openapi.docs.swagger_ui_default_parameters].

            Read more about it in the
            [FastAPI docs about how to Configure Swagger UI](https://fastapi.tiangolo.com/how-to/configure-swagger-ui/).
            """
        ),
    ] = None,
) -> HTMLResponse:
    """
    Generate and return the HTML  that loads Swagger UI for the interactive
    API docs (normally served at `/docs`).

    You would only call this function yourself if you needed to override some parts,
    for example the URLs to use to load Swagger UI's JavaScript and CSS.

    Read more about it in the
    [FastAPI docs for Configure Swagger UI](https://fastapi.tiangolo.com/how-to/configure-swagger-ui/)
    and the [FastAPI docs for Custom Docs UI Static Assets (Self-Hosting)](https://fastapi.tiangolo.com/how-to/custom-docs-ui-assets/).
    """
    current_swagger_ui_parameters = swagger_ui_default_parameters.copy()
    if swagger_ui_parameters:
        current_swagger_ui_parameters.update(swagger_ui_parameters)

    html = f"""
    <!DOCTYPE html>
    <html>
    <head>
    <meta name="viewport" content="width=device-width, initial-scale=1.0">
    <link type="text/css" rel="stylesheet" href="{swagger_css_url}">
    <link rel="shortcut icon" href="{swagger_favicon_url}">
    <title>{title}</title>
    </head>
    <body>
    <div id="swagger-ui">
    </div>
    <script src="{swagger_js_url}"></script>
    <!-- `SwaggerUIBundle` is now available on the page -->
    <script>
    const ui = SwaggerUIBundle({{
        url: '{openapi_url}',
    """

    for key, value in current_swagger_ui_parameters.items():
        html += f"{_html_safe_json(key)}: {_html_safe_json(jsonable_encoder(value))},\n"

    if oauth2_redirect_url:
        html += f"oauth2RedirectUrl: window.location.origin + '{oauth2_redirect_url}',"

    html += """
    presets: [
        SwaggerUIBundle.presets.apis,
        SwaggerUIBundle.SwaggerUIStandalonePreset
        ],
    })"""

    if init_oauth:
        html += f"""
        ui.initOAuth({_html_safe_json(jsonable_encoder(init_oauth))})
        """

    html += """
    </script>
    </body>
    </html>
    """
    return HTMLResponse(html)


def get_redoc_html(
    *,
    openapi_url: Annotated[
        str,
        Doc(
            """
            The OpenAPI URL that ReDoc should load and use.

            This is normally done automatically by FastAPI using the default URL
            `/openapi.json`.

            Read more about it in the
            [FastAPI docs for Conditional OpenAPI](https://fastapi.tiangolo.com/how-to/conditional-openapi/#conditional-openapi-from-settings-and-env-vars)
            """
        ),
    ],
    title: Annotated[
        str,
        Doc(
            """
            The HTML `<title>` content, normally shown in the browser tab.

            Read more about it in the
            [FastAPI docs for Custom Docs UI Static Assets](https://fastapi.tiangolo.com/how-to/custom-docs-ui-assets/)
            """
        ),
    ],
    redoc_js_url: Annotated[
        str,
        Doc(
            """
            The URL to use to load the ReDoc JavaScript.

            It is normally set to a CDN URL.

            Read more about it in the
            [FastAPI docs for Custom Docs UI Static Assets](https://fastapi.tiangolo.com/how-to/custom-docs-ui-assets/)
            """
        ),
    ] = "https://cdn.jsdelivr.net/npm/redoc@2/bundles/redoc.standalone.js",
    redoc_favicon_url: Annotated[
        str,
        Doc(
            """
            The URL of the favicon to use. It is normally shown in the browser tab.
            """
        ),
    ] = "https://fastapi.tiangolo.com/img/favicon.png",
    with_google_fonts: Annotated[
        bool,
        Doc(
            """
            Load and use Google Fonts.
            """
        ),
    ] = True,
) -> HTMLResponse:
    """
    Generate and return the HTML response that loads ReDoc for the alternative
    API docs (normally served at `/redoc`).

    You would only call this function yourself if you needed to override some parts,
    for example the URLs to use to load ReDoc's JavaScript and CSS.

    Read more about it in the
    [FastAPI docs for Custom Docs UI Static Assets (Self-Hosting)](https://fastapi.tiangolo.com/how-to/custom-docs-ui-assets/).
    """
    html = f"""
    <!DOCTYPE html>
    <html>
    <head>
    <title>{title}</title>
    <!-- needed for adaptive design -->
    <meta charset="utf-8"/>
    <meta name="viewport" content="width=device-width, initial-scale=1">
    """
    if with_google_fonts:
        html += """
    <link href="https://fonts.googleapis.com/css?family=Montserrat:300,400,700|Roboto:300,400,700" rel="stylesheet">
    """
    html += f"""
    <link rel="shortcut icon" href="{redoc_favicon_url}">
    <!--
    ReDoc doesn't change outer page styles
    -->
    <style>
      body {{
        margin: 0;
        padding: 0;
      }}
    </style>
    </head>
    <body>
    <noscript>
        ReDoc requires Javascript to function. Please enable it to browse the documentation.
    </noscript>
    <redoc spec-url="{openapi_url}"></redoc>
    <script src="{redoc_js_url}"> </script>
    </body>
    </html>
    """
    return HTMLResponse(html)


def get_swagger_ui_oauth2_redirect_html() -> HTMLResponse:
    """
    Generate the HTML response with the OAuth2 redirection for Swagger UI.

    You normally don't need to use or change this.
    """
    # copied from https://github.com/swagger-api/swagger-ui/blob/v4.14.0/dist/oauth2-redirect.html
    html = """
    <!doctype html>
    <html lang="en-US">
    <head>
        <title>Swagger UI: OAuth2 Redirect</title>
    </head>
    <body>
    <script>
        'use strict';
        function run () {
            var oauth2 = window.opener.swaggerUIRedirectOauth2;
            var sentState = oauth2.state;
            var redirectUrl = oauth2.redirectUrl;
            var isValid, qp, arr;

            if (/code|token|error/.test(window.location.hash)) {
                qp = window.location.hash.substring(1).replace('?', '&');
            } else {
                qp = location.search.substring(1);
            }

            arr = qp.split("&");
            arr.forEach(function (v,i,_arr) { _arr[i] = '"' + v.replace('=', '":"') + '"';});
            qp = qp ? JSON.parse('{' + arr.join() + '}',
                    function (key, value) {
                        return key === "" ? value : decodeURIComponent(value);
                    }
            ) : {};

            isValid = qp.state === sentState;

            if ((
              oauth2.auth.schema.get("flow") === "accessCode" ||
              oauth2.auth.schema.get("flow") === "authorizationCode" ||
              oauth2.auth.schema.get("flow") === "authorization_code"
            ) && !oauth2.auth.code) {
                if (!isValid) {
                    oauth2.errCb({
                        authId: oauth2.auth.name,
                        source: "auth",
                        level: "warning",
                        message: "Authorization may be unsafe, passed state was changed in server. The passed state wasn't returned from auth server."
                    });
                }

                if (qp.code) {
                    delete oauth2.state;
                    oauth2.auth.code = qp.code;
                    oauth2.callback({auth: oauth2.auth, redirectUrl: redirectUrl});
                } else {
                    let oauthErrorMsg;
                    if (qp.error) {
                        oauthErrorMsg = "["+qp.error+"]: " +
                            (qp.error_description ? qp.error_description+ ". " : "no accessCode received from the server. ") +
                            (qp.error_uri ? "More info: "+qp.error_uri : "");
                    }

                    oauth2.errCb({
                        authId: oauth2.auth.name,
                        source: "auth",
                        level: "error",
                        message: oauthErrorMsg || "[Authorization failed]: no accessCode received from the server."
                    });
                }
            } else {
                oauth2.callback({auth: oauth2.auth, token: qp, isValid: isValid, redirectUrl: redirectUrl});
            }
            window.close();
        }

        if (document.readyState !== 'loading') {
            run();
        } else {
            document.addEventListener('DOMContentLoaded', function () {
                run();
            });
        }
    </script>
    </body>
    </html>
        """
    return HTMLResponse(content=html)
Ви можете переписати будь-яке з них, задавши інше значення в аргументі swagger_ui_parameters.
Наприклад, щоб вимкнути deepLinking, ви можете передати такі налаштування до swagger_ui_parameters:
from fastapi import FastAPI

app = FastAPI(swagger_ui_parameters={"deepLinking": False})


@app.get("/users/{username}")
async def read_user(username: str):
    return {"message": f"Hello {username}"}
Інші параметри Swagger UI
Щоб побачити всі можливі налаштування, які ви можете використовувати, прочитайте офіційну документацію щодо параметрів Swagger UI.
Налаштування лише для JavaScript
Swagger UI також дозволяє інші налаштування як об’єкти, що є тільки для JavaScript (наприклад, функції JavaScript).
FastAPI також включає такі налаштування presets, що є лише для JavaScript:
presets: [
    SwaggerUIBundle.presets.apis,
    SwaggerUIBundle.SwaggerUIStandalonePreset
]
Це об’єкти JavaScript, а не строки, тому ви не можете передати їх безпосередньо з коду Python.
Якщо вам потрібно використати такі налаштування лише для JavaScript, скористайтеся одним із методів вище. Повністю перепишіть операцію шляху Swagger UI та вручну напишіть потрібний JavaScript.