Python Types परिचय
🌐 एआई और मनुष्यों द्वारा किया गया अनुवाद
यह अनुवाद मनुष्यों के मार्गदर्शन में एआई द्वारा किया गया है। 🤝
इसमें मूल अर्थ को गलत समझने या अप्राकृतिक लगने आदि जैसी गलतियाँ हो सकती हैं। 🤖
आप हमें एआई LLM को बेहतर मार्गदर्शन करने में मदद करके इस अनुवाद को बेहतर बना सकते हैं।
Python में वैकल्पिक "type hints" (जिन्हें "type annotations" भी कहा जाता है) का समर्थन है।
ये "type hints" या annotations एक विशेष syntax हैं, जो किसी variable का type घोषित करने की अनुमति देते हैं।
अपने variables के लिए types घोषित करके, editors और tools आपको बेहतर support दे सकते हैं।
यह Python type hints के बारे में बस एक त्वरित tutorial / refresher है। इसमें केवल उतना ही शामिल है जितना उन्हें FastAPI के साथ उपयोग करने के लिए न्यूनतम रूप से आवश्यक है... जो वास्तव में बहुत कम है।
FastAPI पूरी तरह से इन्हीं type hints पर आधारित है, ये इसे कई फायदे और लाभ देते हैं।
लेकिन अगर आप कभी FastAPI का उपयोग नहीं भी करते, तब भी इनके बारे में थोड़ा सीखने से आपको लाभ होगा।
नोट
अगर आप Python expert हैं, और type hints के बारे में पहले से सब कुछ जानते हैं, तो अगले chapter पर जाएँ।
प्रेरणा
आइए एक सरल उदाहरण से शुरू करें:
def get_full_name(first_name, last_name):
    full_name = first_name.title() + " " + last_name.title()
    return full_name


print(get_full_name("john", "doe"))
इस program को call करने पर output आता है:
John Doe
Function निम्नलिखित करता है:
- एक
first_nameऔरlast_nameलेता है। - प्रत्येक के पहले अक्षर को
title()के साथ upper case में बदलता है। - उन्हें बीच में एक space के साथ Concatenate करता है।
def get_full_name(first_name, last_name):
    full_name = first_name.title() + " " + last_name.title()
    return full_name


print(get_full_name("john", "doe"))
इसे edit करें
यह एक बहुत सरल program है।
लेकिन अब कल्पना करें कि आप इसे scratch से लिख रहे थे।
किसी point पर आप function define करना शुरू करते हैं, और आपके parameters तैयार हैं...
लेकिन फिर आपको "वह method जो पहले अक्षर को upper case में बदलता है" call करना है।
क्या वह upper था? क्या वह uppercase था? first_uppercase? capitalize?
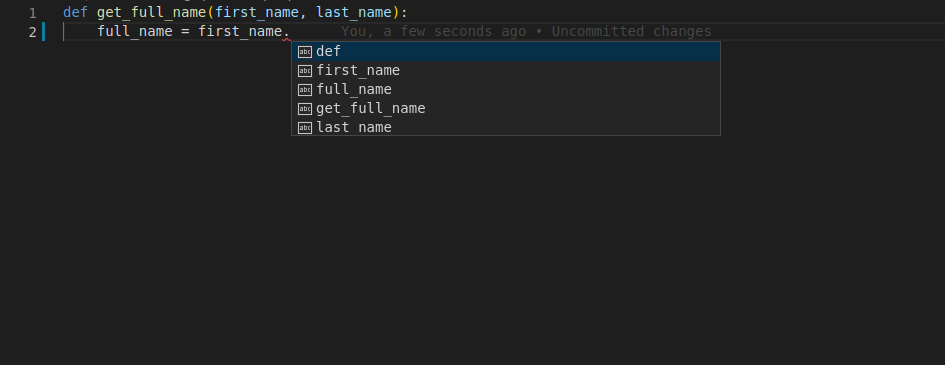
फिर, आप programmer के पुराने दोस्त, editor autocompletion के साथ कोशिश करते हैं।
आप function का पहला parameter, first_name, फिर एक dot (.) type करते हैं और फिर completion trigger करने के लिए Ctrl+Space दबाते हैं।
लेकिन, दुख की बात है, आपको कुछ भी उपयोगी नहीं मिलता:
Types जोड़ें
आइए पिछले version की एक single line बदलते हैं।
हम ठीक इस fragment को, function के parameters को, इससे बदलेंगे:
first_name, last_name
इसमें:
first_name: str, last_name: str
बस इतना ही।
यही "type hints" हैं:
def get_full_name(first_name: str, last_name: str):
    full_name = first_name.title() + " " + last_name.title()
    return full_name


print(get_full_name("john", "doe"))
यह default values declare करने जैसा नहीं है, जैसा कि इसमें होता:
first_name="john", last_name="doe"
यह एक अलग चीज़ है।
हम colons (:) का उपयोग कर रहे हैं, equals (=) का नहीं।
और type hints जोड़ने से सामान्यतः यह नहीं बदलता कि बिना उनके जो होता, वह कैसे होता।
लेकिन अब, कल्पना करें कि आप फिर से उस function को बनाने के बीच में हैं, लेकिन type hints के साथ।
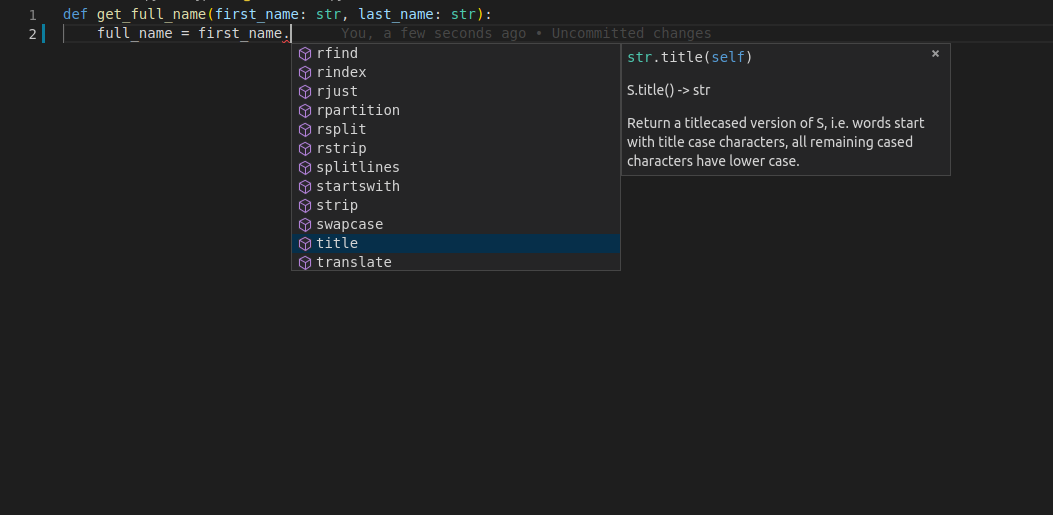
उसी point पर, आप Ctrl+Space के साथ autocomplete trigger करने की कोशिश करते हैं और आप देखते हैं:
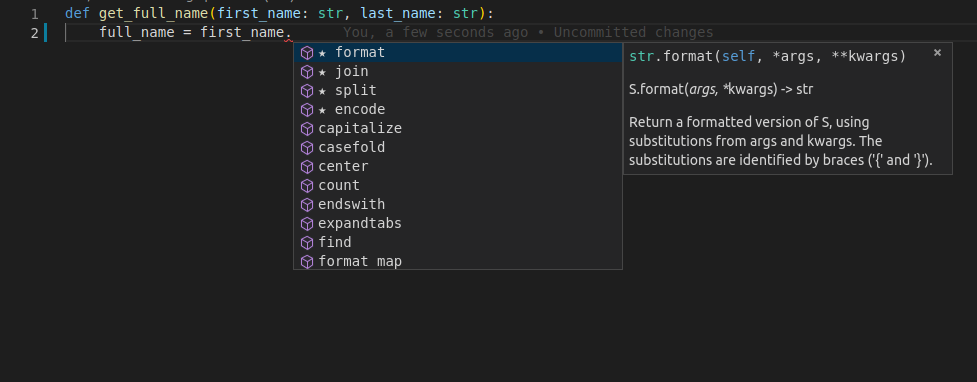
इसके साथ, आप options देखते हुए scroll कर सकते हैं, जब तक आपको वह न मिल जाए जो "पहचाना हुआ लगे":
और प्रेरणा
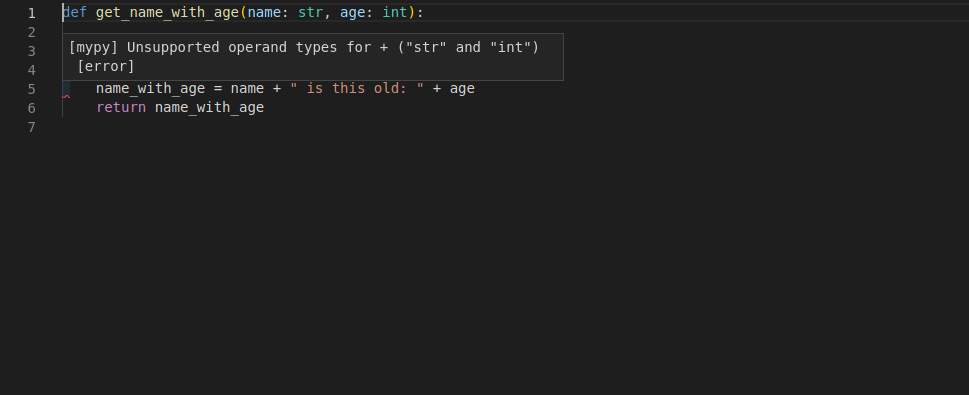
इस function को देखें, इसमें पहले से type hints हैं:
def get_name_with_age(name: str, age: int):
    name_with_age = name + " is this old: " + age
    return name_with_age
क्योंकि editor variables के types जानता है, आपको केवल completion ही नहीं मिलता, आपको error checks भी मिलते हैं:
अब आप जानते हैं कि आपको इसे ठीक करना है, age को str(age) के साथ string में convert करना है:
def get_name_with_age(name: str, age: int):
    name_with_age = name + " is this old: " + str(age)
    return name_with_age
Types declare करना
आपने अभी type hints declare करने की मुख्य जगह देखी। Function parameters के रूप में।
यही वह मुख्य जगह भी है जहाँ आप उन्हें FastAPI के साथ उपयोग करेंगे।
Simple types
आप सभी standard Python types declare कर सकते हैं, केवल str ही नहीं।
आप उदाहरण के लिए उपयोग कर सकते हैं:
intfloatboolbytes
def get_items(item_a: str, item_b: int, item_c: float, item_d: bool, item_e: bytes):
    return item_a, item_b, item_c, item_d, item_e
typing module
कुछ अतिरिक्त use cases के लिए, आपको standard library के typing module से कुछ चीज़ें import करने की आवश्यकता हो सकती है, उदाहरण के लिए जब आप declare करना चाहते हैं कि किसी चीज़ का "कोई भी type" है, तो आप typing से Any का उपयोग कर सकते हैं:
from typing import Any


def some_function(data: Any):
    print(data)
Generic types
कुछ types square brackets में "type parameters" ले सकते हैं, ताकि उनके internal types define किए जा सकें, उदाहरण के लिए "strings की list" को list[str] declare किया जाएगा।
जो types type parameters ले सकते हैं उन्हें Generic types या Generics कहा जाता है।
आप उन्हीं builtin types को generics के रूप में उपयोग कर सकते हैं (square brackets और अंदर types के साथ):
listtuplesetdict
List
उदाहरण के लिए, आइए एक variable को str की list के रूप में define करते हैं।
Variable को उसी colon (:) syntax के साथ declare करें।
Type के रूप में, list रखें।
क्योंकि list एक ऐसा type है जिसमें कुछ internal types होते हैं, आप उन्हें square brackets में रखते हैं:
def process_items(items: list[str]):
    for item in items:
        print(item)
नोट
Square brackets में मौजूद उन internal types को "type parameters" कहा जाता है।
इस case में, str वह type parameter है जो list को pass किया गया है।
इसका मतलब है: "variable items एक list है, और इस list का प्रत्येक item एक str है"।
ऐसा करने से, आपका editor list से items process करते समय भी support दे सकता है:
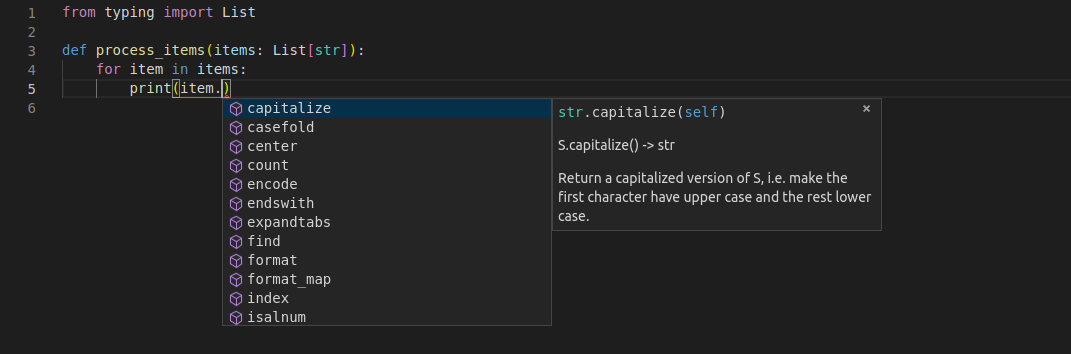
Types के बिना, इसे हासिल करना लगभग असंभव है।
ध्यान दें कि variable item, list items के elements में से एक है।
और फिर भी, editor जानता है कि यह एक str है, और उसके लिए support देता है।
Tuple और Set
आप tuples और sets declare करने के लिए भी ऐसा ही करेंगे:
def process_items(items_t: tuple[int, int, str], items_s: set[bytes]):
    return items_t, items_s
इसका मतलब है:
- Variable
items_t3 items वाला एकtupleहै, एकint, दूसराint, और एकstr। - Variable
items_sएकsetहै, और इसके प्रत्येक item का typebytesहै।
Dict
dict define करने के लिए, आप 2 type parameters pass करते हैं, commas से separated।
पहला type parameter dict की keys के लिए होता है।
दूसरा type parameter dict की values के लिए होता है:
def process_items(prices: dict[str, float]):
    for item_name, item_price in prices.items():
        print(item_name)
        print(item_price)
इसका मतलब है:
- Variable
pricesएकdictहै:- इस
dictकी keysstrtype की हैं (मान लें, प्रत्येक item का नाम)। - इस
dictकी valuesfloattype की हैं (मान लें, प्रत्येक item की price)।
- इस
Union
आप declare कर सकते हैं कि कोई variable कई types में से कोई भी हो सकता है, उदाहरण के लिए, एक int या एक str।
इसे define करने के लिए आप दोनों types को separate करने के लिए vertical bar (|) का उपयोग करते हैं।
इसे "union" कहा जाता है, क्योंकि variable उन दो type sets के union में कुछ भी हो सकता है।
def process_item(item: int | str):
    print(item)
इसका मतलब है कि item एक int या एक str हो सकता है।
संभवतः None
आप declare कर सकते हैं कि किसी value का type, जैसे str, हो सकता है, लेकिन वह None भी हो सकती है।
def say_hi(name: str | None = None):
    if name is not None:
        print(f"Hey {name}!")
    else:
        print("Hello World")
सिर्फ str के बजाय str | None का उपयोग करने से editor आपको उन errors को detect करने में मदद करेगा जहाँ आप यह मान रहे हो सकते हैं कि कोई value हमेशा str है, जबकि वास्तव में वह None भी हो सकती है।
Classes को types के रूप में
आप किसी class को भी variable के type के रूप में declare कर सकते हैं।
मान लें आपके पास एक class Person है, जिसमें एक name है:
class Person:
    def __init__(self, name: str):
        self.name = name


def get_person_name(one_person: Person):
    return one_person.name
फिर आप किसी variable को Person type का declare कर सकते हैं:
class Person:
    def __init__(self, name: str):
        self.name = name


def get_person_name(one_person: Person):
    return one_person.name
और फिर, फिर से, आपको पूरा editor support मिलता है:
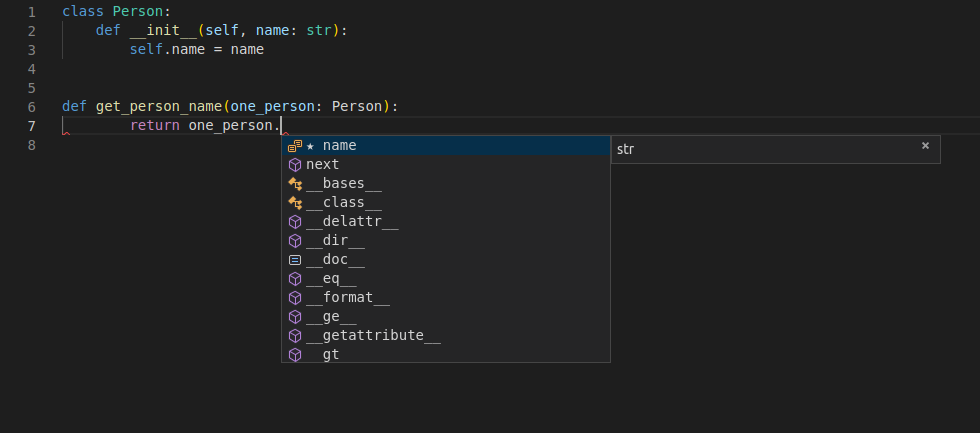
ध्यान दें कि इसका मतलब है "one_person, class Person का एक instance है"।
इसका मतलब यह नहीं है कि "one_person, Person नाम की class है"।
Pydantic models
Pydantic data validation करने के लिए एक Python library है।
आप data की "shape" को attributes वाली classes के रूप में declare करते हैं।
और प्रत्येक attribute का एक type होता है।
फिर आप कुछ values के साथ उस class का एक instance create करते हैं और यह values को validate करेगा, उन्हें appropriate type में convert करेगा (अगर ऐसा case है) और आपको पूरे data वाला एक object देगा।
और उस resulting object के साथ आपको पूरा editor support मिलता है।
Official Pydantic docs से एक उदाहरण:
from datetime import datetime

from pydantic import BaseModel


class User(BaseModel):
    id: int
    name: str = "John Doe"
    signup_ts: datetime | None = None
    friends: list[int] = []


external_data = {
    "id": "123",
    "signup_ts": "2017-06-01 12:22",
    "friends": [1, "2", b"3"],
}
user = User(**external_data)
print(user)
# > User id=123 name='John Doe' signup_ts=datetime.datetime(2017, 6, 1, 12, 22) friends=[1, 2, 3]
print(user.id)
# > 123
नोट
अधिक जानने के लिए Pydantic, इसके docs देखें।
FastAPI पूरी तरह से Pydantic पर आधारित है।
आप यह सब practice में Tutorial - User Guide में बहुत अधिक देखेंगे।
Metadata Annotations के साथ Type Hints
Python में एक feature भी है जो Annotated का उपयोग करके इन type hints में अतिरिक्त metadata डालने की अनुमति देता है।
आप typing से Annotated import कर सकते हैं।
from typing import Annotated


def say_hello(name: Annotated[str, "this is just metadata"]) -> str:
    return f"Hello {name}"
Python खुद इस Annotated के साथ कुछ नहीं करता। और editors और अन्य tools के लिए, type अभी भी str है।
लेकिन आप Annotated में इस जगह का उपयोग FastAPI को अतिरिक्त metadata देने के लिए कर सकते हैं कि आप अपनी application को कैसे behave कराना चाहते हैं।
याद रखने वाली महत्वपूर्ण बात यह है कि Annotated को pass किया गया पहला type parameter ही actual type होता है। बाकी सब, अन्य tools के लिए केवल metadata है।
अभी के लिए, आपको बस यह जानना है कि Annotated मौजूद है, और यह standard Python है। 😎
बाद में आप देखेंगे कि यह कितना powerful हो सकता है।
सुझाव
यह तथ्य कि यह standard Python है, इसका मतलब है कि आपको अपने editor में, अपने code को analyze और refactor करने वाले tools के साथ, आदि, अभी भी सबसे अच्छा possible developer experience मिलेगा। ✨
और यह भी कि आपका code कई अन्य Python tools और libraries के साथ बहुत compatible होगा। 🚀
FastAPI में Type hints
FastAPI इन type hints का लाभ उठाकर कई चीज़ें करता है।
FastAPI के साथ आप type hints के साथ parameters declare करते हैं और आपको मिलता है:
- Editor support।
- Type checks।
...और FastAPI उन्हीं declarations का उपयोग करता है:
- Requirements define करने के लिए: request path parameters, query parameters, headers, bodies, dependencies, आदि से।
- Data convert करने के लिए: request से required type में।
- Data validate करने के लिए: प्रत्येक request से आने वाले data को:
- Data invalid होने पर client को लौटाए जाने वाले automatic errors generate करना।
- OpenAPI का उपयोग करके API को document करने के लिए:
- जिसका उपयोग फिर automatic interactive documentation user interfaces द्वारा किया जाता है।
यह सब abstract लग सकता है। चिंता न करें। आप यह सब action में Tutorial - User Guide में देखेंगे।
महत्वपूर्ण बात यह है कि standard Python types का उपयोग करके, एक ही जगह पर (अधिक classes, decorators, आदि जोड़ने के बजाय), FastAPI आपके लिए बहुत सारा काम कर देगा।
नोट
अगर आप पहले ही पूरे tutorial से गुजर चुके हैं और types के बारे में और देखने के लिए वापस आए हैं, तो एक अच्छा resource mypy की "cheat sheet" है।