Metadata और Docs URLs
🌐 एआई और मनुष्यों द्वारा किया गया अनुवाद
यह अनुवाद मनुष्यों के मार्गदर्शन में एआई द्वारा किया गया है। 🤝
इसमें मूल अर्थ को गलत समझने या अप्राकृतिक लगने आदि जैसी गलतियाँ हो सकती हैं। 🤖
आप हमें एआई LLM को बेहतर मार्गदर्शन करने में मदद करके इस अनुवाद को बेहतर बना सकते हैं।
आप अपनी FastAPI application में कई metadata configurations को customize कर सकते हैं।
API के लिए Metadata
आप निम्नलिखित fields set कर सकते हैं, जिनका उपयोग OpenAPI specification और automatic API docs UIs में किया जाता है:
| Parameter | Type | विवरण | ||||||||||||
|---|---|---|---|---|---|---|---|---|---|---|---|---|---|---|
title |
str |
API का title। | ||||||||||||
summary |
str |
API का एक छोटा summary। OpenAPI 3.1.0, FastAPI 0.99.0 से उपलब्ध। | ||||||||||||
description |
str |
API का एक छोटा description। यह Markdown का उपयोग कर सकता है। | ||||||||||||
version |
str |
API का version। यह आपकी अपनी application का version है, OpenAPI का नहीं। उदाहरण के लिए 2.5.0। |
||||||||||||
terms_of_service |
str |
API के Terms of Service के लिए एक URL। यदि दिया गया हो, तो यह URL होना चाहिए। | ||||||||||||
contact |
dict |
exposed API के लिए contact information। इसमें कई fields हो सकते हैं।
|
| Parameter | Type | विवरण |
|---|---|---|
name | str | contact person/organization का identifying name। |
url | str | contact information की ओर point करने वाला URL। URL के format में होना चाहिए। |
email | str | contact person/organization का email address। email address के format में होना चाहिए। |
license_infodictlicense_info fields
| Parameter | Type | विवरण |
|---|---|---|
name | str | REQUIRED (यदि license_info set किया गया हो)। API के लिए उपयोग किया गया license name। |
identifier | str | API के लिए एक SPDX license expression। identifier field, url field के साथ mutually exclusive है। OpenAPI 3.1.0, FastAPI 0.99.0 से उपलब्ध। |
url | str | API के लिए उपयोग किए गए license का URL। URL के format में होना चाहिए। |
आप इन्हें इस तरह set कर सकते हैं:
from fastapi import FastAPI

description = """
ChimichangApp API helps you do awesome stuff. 🚀

## Items

You can **read items**.

## Users

You will be able to:

* **Create users** (_not implemented_).
* **Read users** (_not implemented_).
"""

app = FastAPI(
    title="ChimichangApp",
    description=description,
    summary="Deadpool's favorite app. Nuff said.",
    version="0.0.1",
    terms_of_service="http://example.com/terms/",
    contact={
        "name": "Deadpoolio the Amazing",
        "url": "http://x-force.example.com/contact/",
        "email": "dp@x-force.example.com",
    },
    license_info={
        "name": "Apache 2.0",
        "url": "https://www.apache.org/licenses/LICENSE-2.0.html",
    },
)


@app.get("/items/")
async def read_items():
    return [{"name": "Katana"}]
सुझाव
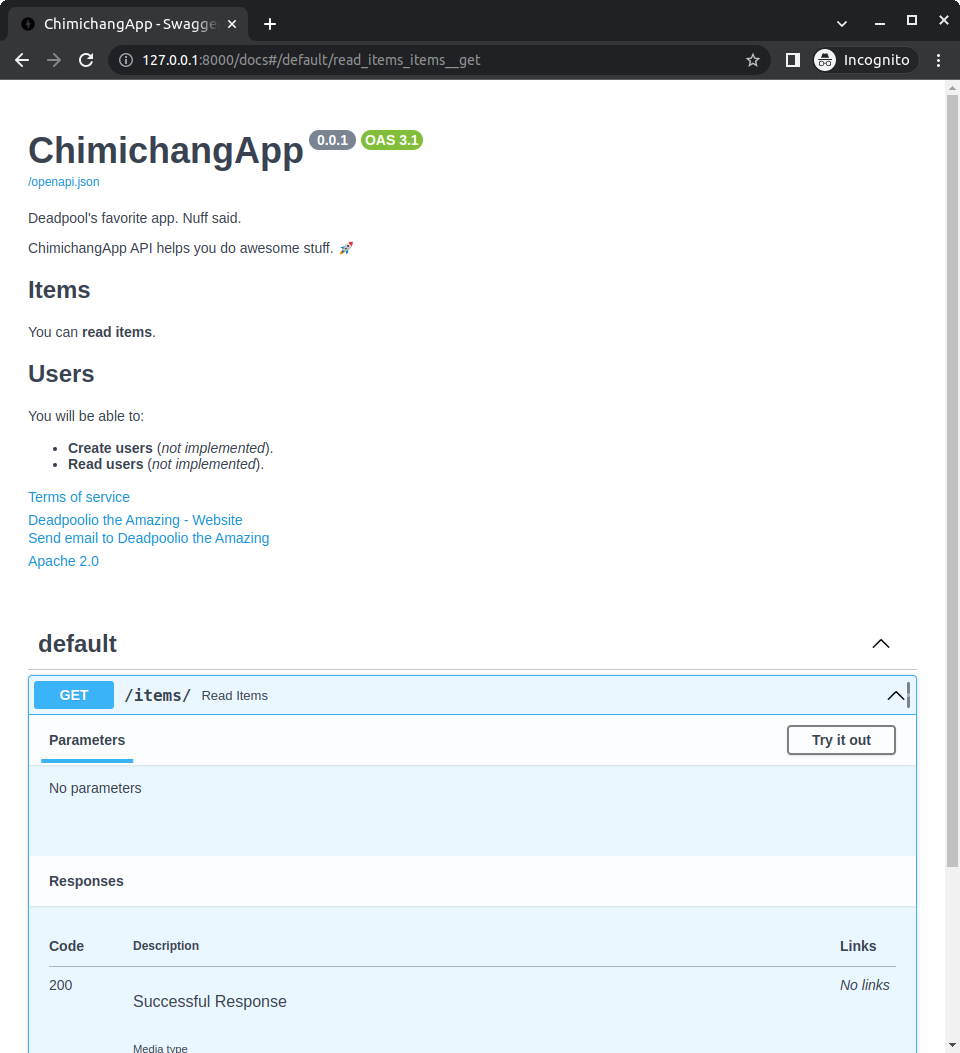
आप description field में Markdown लिख सकते हैं और यह output में render होगा।
इस configuration के साथ, automatic API docs इस तरह दिखेंगे:
License identifier
OpenAPI 3.1.0 और FastAPI 0.99.0 से, आप license_info को url के बजाय identifier के साथ भी set कर सकते हैं।
उदाहरण के लिए:
from fastapi import FastAPI

description = """
ChimichangApp API helps you do awesome stuff. 🚀

## Items

You can **read items**.

## Users

You will be able to:

* **Create users** (_not implemented_).
* **Read users** (_not implemented_).
"""

app = FastAPI(
    title="ChimichangApp",
    description=description,
    summary="Deadpool's favorite app. Nuff said.",
    version="0.0.1",
    terms_of_service="http://example.com/terms/",
    contact={
        "name": "Deadpoolio the Amazing",
        "url": "http://x-force.example.com/contact/",
        "email": "dp@x-force.example.com",
    },
    license_info={
        "name": "Apache 2.0",
        "identifier": "Apache-2.0",
    },
)


@app.get("/items/")
async def read_items():
    return [{"name": "Katana"}]
Tags के लिए Metadata
आप अपने path operations को group करने के लिए उपयोग किए गए अलग-अलग tags के लिए openapi_tags parameter के साथ अतिरिक्त metadata भी जोड़ सकते हैं।
यह प्रत्येक tag के लिए एक dictionary वाली list लेता है।
प्रत्येक dictionary में हो सकता है:
name(required): वही tag name वालाstr, जिसे आप अपने path operations औरAPIRouters मेंtagsparameter में उपयोग करते हैं।description: tag के लिए short description वालाstr। इसमें Markdown हो सकता है और यह docs UI में दिखाया जाएगा।externalDocs: external documentation का वर्णन करने वालाdict, जिसमें:description: external docs के लिए short description वालाstr।url(required): external documentation के लिए URL वालाstr।
Tags के लिए metadata बनाएँ
आइए इसे users और items के tags वाले एक उदाहरण में आज़माते हैं।
अपने tags के लिए metadata बनाएँ और उसे openapi_tags parameter में pass करें:
from fastapi import FastAPI

tags_metadata = [
    {
        "name": "users",
        "description": "Operations with users. The **login** logic is also here.",
    },
    {
        "name": "items",
        "description": "Manage items. So _fancy_ they have their own docs.",
        "externalDocs": {
            "description": "Items external docs",
            "url": "https://fastapi.tiangolo.com/",
        },
    },
]

app = FastAPI(openapi_tags=tags_metadata)


@app.get("/users/", tags=["users"])
async def get_users():
    return [{"name": "Harry"}, {"name": "Ron"}]


@app.get("/items/", tags=["items"])
async def get_items():
    return [{"name": "wand"}, {"name": "flying broom"}]
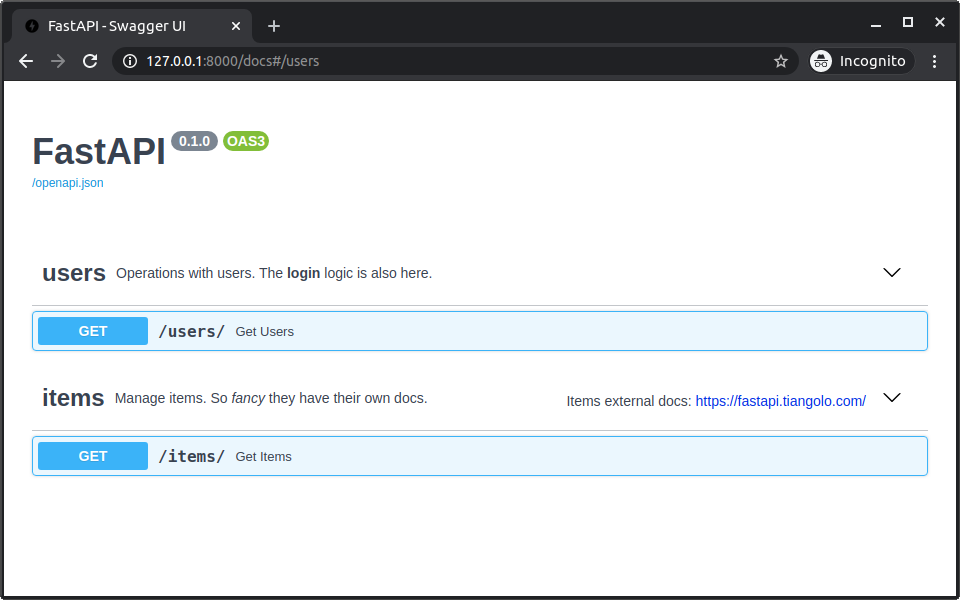
ध्यान दें कि आप descriptions के अंदर Markdown का उपयोग कर सकते हैं, उदाहरण के लिए "login" bold (login) में दिखेगा और "fancy" italics (fancy) में दिखेगा।
सुझाव
आपको अपने उपयोग किए गए सभी tags के लिए metadata जोड़ना ज़रूरी नहीं है।
अपने tags का उपयोग करें
अपने path operations (और APIRouters) के साथ tags parameter का उपयोग करें, ताकि उन्हें अलग-अलग tags में assign किया जा सके:
from fastapi import FastAPI

tags_metadata = [
    {
        "name": "users",
        "description": "Operations with users. The **login** logic is also here.",
    },
    {
        "name": "items",
        "description": "Manage items. So _fancy_ they have their own docs.",
        "externalDocs": {
            "description": "Items external docs",
            "url": "https://fastapi.tiangolo.com/",
        },
    },
]

app = FastAPI(openapi_tags=tags_metadata)


@app.get("/users/", tags=["users"])
async def get_users():
    return [{"name": "Harry"}, {"name": "Ron"}]


@app.get("/items/", tags=["items"])
async def get_items():
    return [{"name": "wand"}, {"name": "flying broom"}]
नोट
Tags के बारे में और पढ़ें Path Operation Configuration में।
Docs जाँचें
अब, अगर आप docs जाँचते हैं, तो वे सभी अतिरिक्त metadata दिखाएँगे:
Tags का क्रम
हर tag metadata dictionary का क्रम भी docs UI में दिखाए जाने वाले क्रम को define करता है।
उदाहरण के लिए, भले ही users alphabetical order में items के बाद आता, यह उनसे पहले दिखाया जाता है, क्योंकि हमने उनकी metadata को list में पहली dictionary के रूप में जोड़ा था।
OpenAPI URL
Default रूप से, OpenAPI schema /openapi.json पर serve किया जाता है।
लेकिन आप इसे openapi_url parameter के साथ configure कर सकते हैं।
उदाहरण के लिए, इसे /api/v1/openapi.json पर serve करने के लिए set करने हेतु:
from fastapi import FastAPI

app = FastAPI(openapi_url="/api/v1/openapi.json")


@app.get("/items/")
async def read_items():
    return [{"name": "Foo"}]
यदि आप OpenAPI schema को पूरी तरह disable करना चाहते हैं, तो आप openapi_url=None set कर सकते हैं, इससे इसका उपयोग करने वाले documentation user interfaces भी disable हो जाएँगे।
Docs URLs
आप शामिल किए गए दो documentation user interfaces configure कर सकते हैं:
- Swagger UI:
/docsपर serve किया जाता है।- आप इसका URL
docs_urlparameter के साथ set कर सकते हैं। - आप
docs_url=Noneset करके इसे disable कर सकते हैं।
- आप इसका URL
- ReDoc:
/redocपर serve किया जाता है।- आप इसका URL
redoc_urlparameter के साथ set कर सकते हैं। - आप
redoc_url=Noneset करके इसे disable कर सकते हैं।
- आप इसका URL
उदाहरण के लिए, Swagger UI को /documentation पर serve करने के लिए set करना और ReDoc को disable करना:
from fastapi import FastAPI

app = FastAPI(docs_url="/documentation", redoc_url=None)


@app.get("/items/")
async def read_items():
    return [{"name": "Foo"}]